понедельник, 19 мая 2014 г.

Intel Adds Ubuntu 14.04 Support to Linux Graphics Driver Installer

intelgraphicsdriverinstaller
Intel’s handy GPU driver installer for Linux has been updated to support Ubuntu 14.04 LTS.
The tool aims to simplify both installation and updating of drivers for Intel’s graphics cards so that users are able to get the best performance out of their hardware and stay “up-to-date with the latest Intel Graphics Stack for Linux”.
But while Ubuntu 14.04 LTS 64-bit and 32-bit get the official nod, along with Fedora 20, the update sees support for earlier versions retired.
Those still sticking with the Saucy Salamander should be aware that Ubuntu 13.10 support has been deprecated as of this release. While the tool can still be used to install drivers on a deprecated release it won’t offer up the most recent graphics stack.
Accordingly, Ubuntu 13.04 (aka Raring Ringtail) moves from ‘deprecated’ status to ‘dropped’.
Intel “strongly encourages” users to make use of their tool on the latest supported releases. In this case, that’s Ubuntu 14.04 LTS.
Support changes aside there is little difference between 1.0.5 of the installation wizard and the version released in March.

Download Intel’s Driver Update Tool

The installer does not support the Ubuntu Linux low-latency kernel nor does it provide binary drivers for the Intel GMA 3600 (bundled with Intel’s Atom N2600 and N2800 chipsets).
Debian installers can be downloaded directly from the Intel Open Technology Centre website, linked below.
Some users have reported an issue with the URL of the repository the installer adds to your system.To fix it see this AskUbuntu article
Взято здесь

пятница, 16 мая 2014 г.

Установить новую версию digiKam 4.0.0 в Ubuntu 14.04 и производные

digiKam — Менеджер цифровых фотографий, позволяющий импортировать, упорядочить, улучшать, искать и экспортировать цифровые фоторафии.
Доступна новая версия программы для управления коллекцией фотографий digiKam 4.0.0. Новый выпуск примечателен интеграцией наработок, созданных в рамках программы Google Summer of Code 2013.


Новое в версии digiKam 4.0.0:
  1. Новый инструмент для систематизации иерархии тегов. Добавление в менеджер тегов и окно просмотра тегов поддержки множественного выделения и переноса групп тегов методом drag-n-drop. Поддержка метаданных для выделения лиц на фотографиях в формате Windows Live Photo.
  2. Новый вспомогательный инструмент для определения качества фотографии и автоматической привязки тегов на основе сопроводительных этикеток;
  3. Панель с миниатюрами фотографий переведена на Qt model-view, что в дальнейшем позволит перевести весь digiKam на Qt 5;
  4. Многочисленные улучшения в инструменте импорта, устранены давно мешающие работе замечания. Например, добавлена индикация ранее загруженных с устройства элементов;
  5. Из кода исключены последние классы, использующие устаревшие методы Qt3. Весь код переведён на Qt4 model-view и готов для миграции на Qt5 после стабилизации API KDE 5;
  6. Поддержка распараллеливания на многоядерных процессорах операций, требующих больших вычислительных ресурсов, таких как фильтры увеличения резкости и контраста (Sharpen, LocalContrast), сокращение шума (Noise Reduction) и применения визуальных эффектов.
Установка digiKam 4.0.0 в Ubuntu 14.04 и производные

Откройте терминал (Ctrl+Aly+T), скопируйте и выполните следующие команды:

sudo add-apt-repository ppa:msylwester/digikam

sudo apt-get update

sudo apt-get install digikam

По окончании установки вы найдёте digiKam в программах Графика.

Источник: http://www.digikam.org

Удачи.

четверг, 15 мая 2014 г.

Oкружение MATE теперь доступно в Ubuntu 14.04

Mate - рабочее окружение которое разрабатываем и поддерживает Linux Mint, это форк Gnome 2 с его двумя панелями, примерно такими же настройками и поведением.
Проект находится в активной разработке, внедряются новые технологии но при этом сохраняется привычный многим внешний вид второго гнома.
Само окружение довольно популярно и в Canonical решили что не стоит им пренебрегать, и добавили в репозиторий Ubuntu 14.04, для установки достаточно в Центре приложений Ubuntu ввести в поиске mate-desktop и установить.
Стоит сразу сказать что Mate только имеет внешний вид Gnome 2, и как говорилось раньше проект в активной разработке, так что есть еще недочеты, но пользоваться можно и довольно неплохо.

среда, 14 мая 2014 г.

Timekpr — Easy To Use Parental Control App for Ubuntu 14.04 LTS


timrkpr linux
If I added up all of the hours I’ve lost at my desktop simply by doing nothing of note I’d likely be eligible for honorary Time Lord status from Gallifrey.
Thankfully, I’m big enough to know when I’m impacting on my productivity and how to sort it out. But kids? Kids sometimes need cajoling – a quick prod in the direction of what’s best for them. And when it comes to computers, that means limiting the amount of time they can spend staring at a backlit display.
Of course, that’s not to say that all time spent in front of a PC or laptop is useless. Many conscientious parents know that there are benefits to be had from letting them indulge their curiosity on Wikipedia, or sharpen their computer skills on forums, and letting them blow off steam on Steam. Outright computer restrictions are unlikely to prove a prudent course of action in the long run.
But sometimes ‘off’ has to mean ‘off’. That’s where oft-hated parental control applications come in handy.

How to Limit Time Spent on Computer

The Windows, Android, and Apple platforms are home to a raft of applications to restrict, limit and otherwise curtail the amount of time someone can spend logged in or what they can view online.
Ubuntu has less choice, which makes the following app stand out more than it might have otherwise.
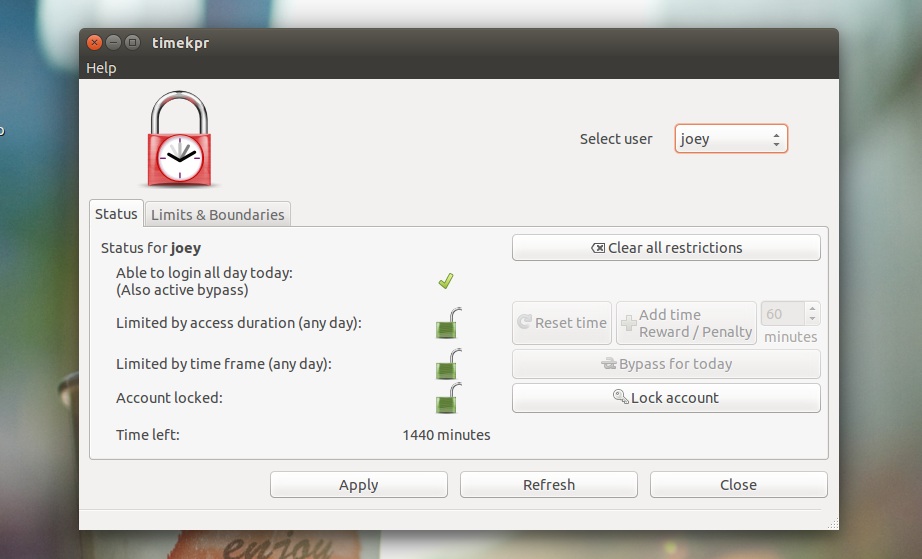
If you want to set the hours of the day when computing is ‘ok’, or a certain amount of time per day, check out Timekpr.  Unlike the majority of “parental control” apps available, Timekpr is not a web blocker or activity monitor. It’s much simpler in aim: it lets you choose when a computer can be used, and when it can’t.

Timekpr Revived

If you’ve spent any time looking into time limiting applications for Ubuntu (which given that you’re reading this article means you probably have) then you’ll have come across Timekpr.
Sadly, development of the app ground to a halt for a few years and the last ‘official’ builds produced were for Ubuntu 11.10.
Not wanting to let a (largely) functional app go to waste a new developer has stepped in to foster it. Eduards Bezverhijs, who encountered the application while looking for something similar to it, has picked up development, wiped the dust off and added a few neat extras to it.
He tells me that the app is ‘by no means new app except the app-indicator for Ubuntu’ and that he simply wants to ‘share a working app for latest version of Ubuntu to the world.’
Eduards is being a little modest. He has added support for LightDM (the display manager used in Ubuntu), support for the systemd login manager ‘loginctl’ and introduced an indicator applet for easy control.

How To Use It

Screen Shot 2014-04-29 at 20.28.10
Timekpr works on a per-user basis. It retrieves a list of accounts from many popular display managers (including GDM, KDM and LXDM) and, providing you’re the root user, allow you to:
  • Set duration access limits (e.g., 1 hour) for selected users
  • Limited time frame of access (e.g., 7 AM to 4 PM) for selected users
  • Configure limitations on a whole week or per-day basis

Get Timekpr for Ubuntu 14.04 LTS

While Timekpr is not the only program offering parental controls on Ubuntu, it is one of the easiest to grapple with. More details, along with a PPA for the app, can be found at launchpad.net/~mjasnik/+archive/ppa.
Debian installers for Ubuntu 14.04 LTS are listed below.
After installing you can launch Timekpr from the command line as root by running:
$ timekpr-gui

Как отобразить меню загрузки GRUB постоянно при установленной единственной системой Ubuntu/Linux Mint

После установки дистрибутива Ubuntu/Linux Mint на жесткий диск компьютера единственной системой, как правило меню загрузки GRUB не появляется во время загрузки и система загружается автоматически.
С одной стороны это хорошо, быстрее грузится система и не нужно нажимать Enter, чтобы освободиться от таймера GRUB, но с другой стороны, пользователь не может попасть в пункт Дополнительные параметры, который отображается в меню, где можно изменить загрузку системы с другого ядра, произвести восстановление системы в случае какого-то сбоя и т.п.
Если вы хотите, чтобы ваша система использовала меню загрузки GRUB, для выбора другого ядра или режима восстановления, то нужно сделать следующее:

Откройте редактор на редактирование файла grub

Для Ubuntu/Linux MInt Cinnamon следующей командой в терминале:

sudo gedit /etc/default/grub

Для Linux Mint MATE:

sudo pluma /etc/default/grub

Когда откроется редактор с файлом, нужно закомментировать (поставить знак решётки# ) перед следующей строкой:

GRUB_HIDDEN_TIMEOUT=0

Должно получиться следующее:

# GRUB_HIDDEN_TIMEOUT=0


А также измените на своё усмотрение время отображения GRUB в строке GRUB_TIMEOUT=10.

После изменений сохраните файл Ctrl+S и закройте редактор.

Затем обновите загрузчик GRUB следующей командой:

sudo update-grub

Перезагрузите компьютер, чтобы увидеть присутствие меню загрузки GRUB во время загрузки:


Вот и всё.

Удачи.