суббота, 10 сентября 2016 г.

Как восстановить файловую систему в fsck

Из-за различных неполадок или неожиданного отключения компьютера файловая система может быть повреждена. При обычном выключении все файловые системы монтируются только для чтения, а все не сохраненные данные записываются на диск.
Но если питание выключается неожиданно, часть данных теряется, и могут быть потерянны важные данные, что приведет к повреждению самой файловой системы. В этой статье мы рассмотрим как восстановить файловую систему fsck, для нескольких популярных файловых систем, а также поговорим о том, как происходит восстановление ext4.

Немного теории

Как вы знаете файловая система содержит всю информацию обо всех хранимых на компьютере файлах. Это сами данные файлов и метаданные, которые управляют расположением и атрибутами файлов в файловой системе. Как я уже говорил, данные не сразу записываются на жесткий диск, а некоторое время находятся в оперативной памяти и при неожиданном выключении, за определенного стечения обстоятельств файловая система может быть повреждена.
Современные файловые системы делятся на два типа - журналируемые и нежурналируемые. Журналиуемые файловые системы записывают в лог все действия, которые собираются выполнить, а после выполнения стирают эти записи. Это позволяет очень быстро понять была ли файловая система повреждена. Но не сильно помогает при восстановлении. Чтобы восстановить файловую систему linux необходимо проверить каждый блок файловой системы и найти поврежденные сектора.
Для этих целей используется утилита fsck. По сути, это оболочка для других утилит, ориентированных на работу только с той или иной файловой системой, например, для fat одна утилита, а для ext4 совсем другая.
В большинстве систем для корневого раздела проверка fsck запускается автоматически, но это не касается других разделов, а также не сработает если вы отключили проверку.

Основы работы с fsck

В этой статье мы рассмотрим ручную работу с fsck. Возможно, вам понадобиться LiveCD носитель, чтобы запустить из него утилиту, если корневой раздел поврежден. Если же нет, то система сможет загрузиться в режим восстановления и вы будете использовать утилиту оттуда. Также вы можете запустить fsck в уже загруженной системе. Только для работы нужны права суперпользователя, поэтому выполняйте ее через sudo.
А теперь давайте рассмотрим сам синтаксис утилиты:
$ fsck [опции] [опции_файловой_системы] [раздел_диска]
Основные опции указывают способ поведения утилиты, оболочки fsck. Раздел диска - это файл устройства раздела в каталоге /dev, например, /dev/sda1 или /dev/sda2. Опции файловой системы специфичны для каждой отдельной утилиты проверки.
А теперь давайте рассмотрим самые полезные опции fsck:
  • -l - не выполнять другой экземпляр fsck для этого жесткого диска, пока текущий не завершит работу. Для SSD параметр игнорируется;
  • -t - задать типы файловых систем, которые нужно проверить. Необязательно указывать устройство, можно проверить несколько разделов одной командой, просто указав нужный тип файловой системы. Это может быть сама файловая система, например, ext4 или ее опции в формате opts=ro. Утилита просматривает все файловые системы, подключенные в fstab. Если задать еще и раздел то к нему будет применена проверка именно указанного типа, без автоопределения;
  • -A - проверить все файловые системы из /etc/fstab. Вот тут применяются параметры проверки файловых систем, указанные в /etc/fstab, в том числе и приоритетность. В первую очередь проверяется корень. Обычно используется при старте системы;
  • -C - показать прогресс проверки файловой системы;
  • -M - не проверять, если файловая система смонтирована;
  • -N - ничего не выполнять, показать, что проверка завершена успешно;
  • -R - не проверять корневую файловую систему;
  • -T - не показывать информацию об утилите;
  • -V - максимально подробный вывод.
Это были глобальные опции утилиты. А теперь рассмотрим опции для работы с файловой системой, их меньше, но они будут более интересны:
  • -a - во время проверки исправить все обнаруженные ошибки, без каких-либо вопросов. Опция устаревшая и ее использовать не рекомендуется;
  • -n - выполнить только проверку файловой системы, ничего не исправлять;
  • -r - спрашивать перед исправлением каждой ошибки, используется по умолчанию для файловых систем ext;
  • -y - отвечает на все вопросы об исправлении ошибок утвердительно, можно сказать, что это эквивалент a.
  • -c - найти и занести в черный список все битые блоки на жестком диске. Доступно только для ext3 и ext4;
  • -f - принудительная проверка файловой системы, даже если по журналу она чистая;
  • -b - задать адрес суперблока, если основной был поврежден;
  • -p - еще один современный аналог опции -a, выполняет проверку и исправление автоматически. По сути, для этой цели можно использовать одну из трех опций: p, a, y.
Теперь мы все разобрали и вы готовы выполнять восстановление файловой системы linux. Перейдем к делу.

Как восстановить файловую систему в fsck

Допустим, вы уже загрузились в LiveCD систему или режим восстановления. Ну, одним словом, готовы к восстановлению ext4 или любой другой поврежденной ФС. Утилита уже установлена по умолчанию во всех дистрибутивах, так что устанавливать ничего не нужно.

Восстановление файловой системы

Если ваша файловая система находится на разделе с адресом /dev/sda1 выполните:
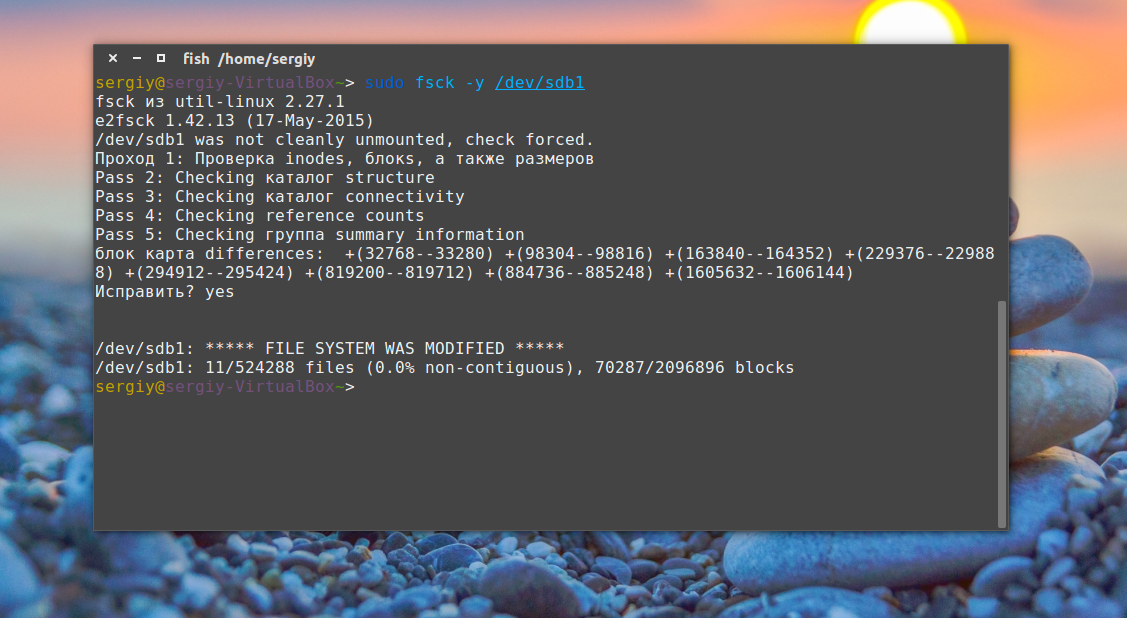
$ sudo fsck -y /dev/sda1
fsck3
Опцию y указывать необязательно, но если этого не сделать утилита просто завалит вас вопросами, на которые нужно отвечать да.

Восстановление поврежденного суперблока

Обычно эта команда справляется со всеми повреждениями на ура. Но если вы сделали что-то серьезное и повредили суперблок, то тут fsck может не помочь. Суперблок - это начало файловой системы. Без него ничего работать не будет.
Но не спешите прощаться с вашими данными, все еще можно восстановить. С помощью такой команды смотрим куда были записаны резервные суперблоки:
$ sudo mkfs -t ext4 -n /dev/sda1
fsck1
На самом деле эта команда создает новую файловую систему. Вместо ext4 подставьте ту файловую систему, в которую был отформатирован раздел, размер блока тоже должен совпадать иначе ничего не сработает. С опцией -n никаких изменений на диск не вноситься, а только выводится информация, в том числе о суперблоках.
Теперь у нас есть шесть резервных адресов суперблоков и мы можем попытаться восстановить файловую систему с помощью каждого из них, например:
$ sudo fsck -b 98304 /dev/sda1
fsck2
После этого, скорее всего, вам удастся восстановить вашу файловую систему. Но рассмотрим еще пару примеров.

Проверка чистой файловой системы

Проверим файловую систему, даже если она чистая:
$ sudo fsck -fy /dev/sda1
fsck4

Битые сектора

Или еще мы можем найти битые сектора и больше в них ничего не писать:
$ sudo fsck -c /dev/sda1
fsck5

Установка файловой системы

Вы можете указать какую файловую систему нужно проверять на разделе, например:
$ sudo fsck -t ext4 /dev/sdb1
fsck6

Проверка всех файловых систем

С помощью флага -A вы можете проверить все файловые системы, подключенные к компьютеру:
$ sudo fsck -A -y
Но такая команда сработает только в режиме восстановления, если корневой раздел и другие разделы уже примонтированы она выдаст ошибку. Но вы можете исключить корневой раздел из проверки добавив R:
$ sudo fsck -AR -y
Или исключить все примонтированные файловые системы:
$ sudo fsck -M -y
Также вы можете проверить не все файловые системы, а только ext4, для этого используйте такую комбинацию опций:
$ sudo fsck -A -t ext4 -y
Или можно также фильтровать по опциям монтирования в /etc/fstab, например, проверим файловые системы, которые монтируются только для чтения:
$ sudo fsck -A -t opts=ro

Проверка примонтированных файловых систем

Раньше я говорил что нельзя. Но если другого выхода нет, то можно, правда не рекомендуется. Для этого нужно сначала перемонтировать файловую систему в режим только для чтения. Например:
$ sudo mount -o remount,ro /dev/sdb1
А теперь проверка файловой системы fsck в принудительном режиме:
$ sudo fsck -fy /dev/sdb1
fsck7

Просмотр информации

Если вы не хотите ничего исправлять, а только посмотреть информацию, используйте опцию -n:
$ sudo fsck -n /dev/sdb1
fsck8

Выводы

Вот и все, теперь вы знаете как выполняется восстановление файловой системы ext4 или любой другой, поддерживаемой в linux fsck. Если у вас остались вопросы, спрашивайте в комментариях!
суббота, 20 августа 2016 г.

Всем у кого зависают дистрибутивы на INTEL BAY TRAIL

Всем у кого зависают дистрибутивы на INTEL BAY TRAIL:1. sudo gedit /etc/default/grub2. В строке GRUB_CMDLINE_LINUX_DEFAULT добавляем intel_idle.max_cstate=13. sudo update-grubПерезагружаем и радуемся жизни. Надеюсь кому-нибудь поможет!

суббота, 23 июля 2016 г.

Linux file system hierarchy v2.0

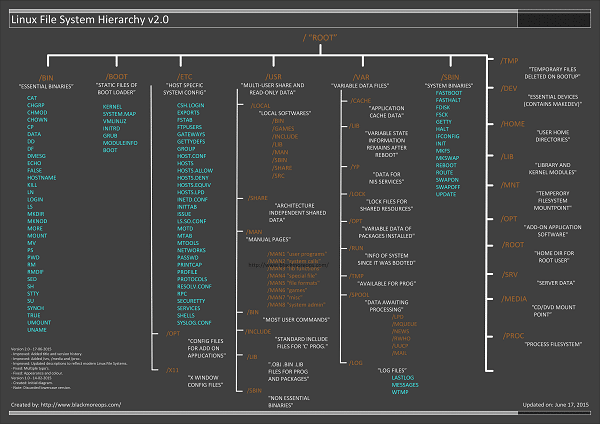
What is a file in Linux? What is file system in Linux? Where are all the configuration files? Where do I keep my downloaded applications? Is there really a filesystem standard structure in Linux? Well, the above image explains Linux file system hierarchy in a very simple and non-complex way. It’s very useful when you’re looking for a configuration file or a binary file. I’ve added some explanation and examples below, but that’s TL;DR.
Another issue is when you got configuration and binary files all over the system that creates inconsistency and if you’re a large organization or even an end user, it can compromise your system (binary talking with old lib files etc.) and when you do security audit of your Linux system, you find it is vulnerable to different exploits. So keeping a clean operating system (no matter Windows or Linux) is important.

What is a file in Linux?

A simple description of the UNIX system, also applicable to Linux, is this:
On a UNIX system, everything is a file; if something is not a file, it is a process.
This statement is true because there are special files that are more than just files (named pipes and sockets, for instance), but to keep things simple, saying that everything is a file is an acceptable generalization. A Linux system, just like UNIX, makes no difference between a file and a directory, since a directory is just a file containing names of other files. Programs, services, texts, images, and so forth, are all files. Input and output devices, and generally all devices, are considered to be files, according to the system.
Linux file system hierarchy v2.0 - 600px - blackMORE Ops
  • Version 2.0 – 17-06-2015
    • – Improved: Added title and version history.
    • – Improved: Added /srv, /media and /proc.
    • – Improved: Updated descriptions to reflect modern Linux File Systems.
    • – Fixed: Multiple typo’s.
    • – Fixed: Appearance and colour.
  • Version 1.0 – 14-02-2015
    • – Created: Initial diagram.
    • – Note: Discarded lowercase version.

Download Links

Following are two links for download. If you need this in any other format, let me know and I will try to create that and upload it somewhere.
Large (PNG) Format – 2480×1755 px – 184KB Largest (PDF) Format – 9919×7019 px – 1686KB
Note: PDF Format is best for printing and very high in quality

Linux file system description

In order to manage all those files in an orderly fashion, man likes to think of them in an ordered tree-like structure on the hard disk, as we know from MS-DOS (Disk Operating System) for instance. The large branches contain more branches, and the branches at the end contain the tree’s leaves or normal files. For now we will use this image of the tree, but we will find out later why this is not a fully accurate image.
DIRECTORYDESCRIPTION
/
Primary hierarchy root and root directory of the entire file system hierarchy.
/bin
Essential command binaries that need to be available in single user mode; for all users, e.g., cat, ls, cp.
/boot
Boot loader files, e.g., kernels, initrd.
/dev
Essential devices, e.g./dev/null.
/etc
Host-specific system-wide configuration filesThere has been controversy over the meaning of the name itself. In early versions of the UNIX Implementation Document from Bell labs, /etc is referred to as theetcetera directory, as this directory historically held everything that did not belong elsewhere (however, the FHS restricts /etc to static configuration files and may not contain binaries). Since the publication of early documentation, the directory name has been re-designated in various ways. Recent interpretations include backronyms such as “Editable Text Configuration” or “Extended Tool Chest”.
/opt
Configuration files for add-on packages that are stored in /opt/.
/sgml
Configuration files, such as catalogs, for software that processes SGML.
/X11
Configuration files for the X Window System, version 11.
/xml
Configuration files, such as catalogs, for software that processes XML.
/home
Users’ home directories, containing saved files, personal settings, etc.
/lib
Libraries essential for the binaries in /bin/ and /sbin/.
/lib<qual>
Alternate format essential libraries. Such directories are optional, but if they exist, they have some requirements.
/media
Mount points for removable media such as CD-ROMs (appeared in FHS-2.3).
/mnt
Temporarily mounted filesystems.
/opt
Optional application software packages.
/proc
Virtual filesystem providing process and kernel information as files. In Linux, corresponds to a procfs mount.
/root
Home directory for the root user.
/sbin
Essential system binaries, e.g., init, ip, mount.
/srv
Site-specific data which are served by the system.
/tmp
Temporary files (see also /var/tmp). Often not preserved between system reboots.
/usr
Secondary hierarchy for read-only user data; contains the majority of (multi-)user utilities and applications.
/bin
Non-essential command binaries (not needed in single user mode); for all users.
/include
Standard include files.
/lib
Libraries for the binaries in /usr/bin/ and /usr/sbin/.
/lib<qual>
Alternate format libraries (optional).
/local
Tertiary hierarchy for local data, specific to this host. Typically has further subdirectories, e.g.bin/lib/,share/.
/sbin
Non-essential system binaries, e.g., daemons for various network-services.
/share
Architecture-independent (shared) data.
/src
Source code, e.g., the kernel source code with its header files.
/X11R6
X Window System, Version 11, Release 6.
/var
Variable files—files whose content is expected to continually change during normal operation of the system—such as logs, spool files, and temporary e-mail files.
/cache
Application cache data. Such data are locally generated as a result of time-consuming I/O or calculation. The application must be able to regenerate or restore the data. The cached files can be deleted without loss of data.
/lib
State information. Persistent data modified by programs as they run, e.g., databases, packaging system metadata, etc.
/lock
Lock files. Files keeping track of resources currently in use.
/log
Log files. Various logs.
/mail
Users’ mailboxes.
/opt
Variable data from add-on packages that are stored in /opt/.
/run
Information about the running system since last boot, e.g., currently logged-in users and running daemons.
/spool
Spool for tasks waiting to be processed, e.g., print queues and outgoing mail queue.
/mail
Deprecated location for users’ mailboxes.
/tmp
Temporary files to be preserved between reboots.

Types of files in Linux

Most files are just files, called regular files; they contain normal data, for example text files, executable files or programs, input for or output from a program and so on.
While it is reasonably safe to suppose that everything you encounter on a Linux system is a file, there are some exceptions.
  • Directories: files that are lists of other files.
  • Special files: the mechanism used for input and output. Most special files are in /dev, we will discuss them later.
  • Links: a system to make a file or directory visible in multiple parts of the system’s file tree. We will talk about links in detail.
  • (Domain) sockets: a special file type, similar to TCP/IP sockets, providing inter-process networking protected by the file system’s access control.
  • Named pipes: act more or less like sockets and form a way for processes to communicate with each other, without using network socket semantics.

File system in reality

For most users and for most common system administration tasks, it is enough to accept that files and directories are ordered in a tree-like structure. The computer, however, doesn’t understand a thing about trees or tree-structures.
Every partition has its own file system. By imagining all those file systems together, we can form an idea of the tree-structure of the entire system, but it is not as simple as that. In a file system, a file is represented by an inode, a kind of serial number containing information about the actual data that makes up the file: to whom this file belongs, and where is it located on the hard disk.
Every partition has its own set of inodes; throughout a system with multiple partitions, files with the same inode number can exist.
Each inode describes a data structure on the hard disk, storing the properties of a file, including the physical location of the file data. When a hard disk is initialized to accept data storage, usually during the initial system installation process or when adding extra disks to an existing system, a fixed number of inodes per partition is created. This number will be the maximum amount of files, of all types (including directories, special files, links etc.) that can exist at the same time on the partition. We typically count on having 1 inode per 2 to 8 kilobytes of storage.At the time a new file is created, it gets a free inode. In that inode is the following information:
  • Owner and group owner of the file.
  • File type (regular, directory, …)
  • Permissions on the file
  • Date and time of creation, last read and change.
  • Date and time this information has been changed in the inode.
  • Number of links to this file (see later in this chapter).
  • File size
  • An address defining the actual location of the file data.
The only information not included in an inode, is the file name and directory. These are stored in the special directory files. By comparing file names and inode numbers, the system can make up a tree-structure that the user understands. Users can display inode numbers using the -i option to ls. The inodes have their own separate space on the disk.